
INSTRUCTIONS
**LOCATION VERY IMPORTANT**
We suggest installing the Poolmiser outside of the decking area to eliminate possible earth movement problems. We recommend that the POOLMISER and all pipes within 3 feet be backfilled with sand.
STEP 1
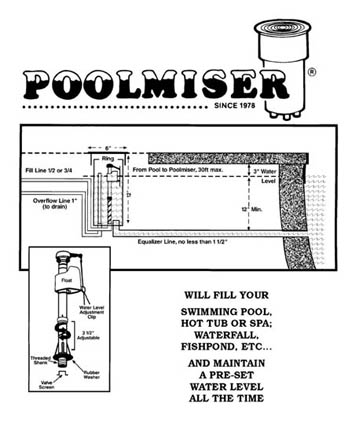
BUILT-IN POOLS (GUNITE OR CONCRETE): Before you gunite, place the Poolmiser (with the tank top) 3 inches higher than desired water level. Extend the 1 ½” equalizer line through the gunite, allowing enough to extend through finished plaster (can be cut later). VERY IMPORTANT: The equalizer line must be a minimum of 12 inches below desired water level. Hook up the threaded fill inlet to the water line and connect the overflow line to a convenient drain. (It is recommended to add a shut-off valve between the Poolmiser and the main water line). When guniting, fill the tank with newspaper to make clean-up easier.
*VINYL LINER IN-GROUND POOLS, ABOVE GROUND POOLS, STEEL WALL POOLS, TUBS, OR SPAS: Use the same process as above. The only difference is the equalizer line must go through the wall using an inlet fitting.
STEP 2
Before installing the valve into the tank, remove the newspaper, insert the black washer seal and the filter screen, and flush the lines two or three times. Remove the cap from the valve to permit it to screw freely into the tank. Hand tighten the valve into the tank.
Before replacing the cap, flush the whole system one more time, turn on your water supply, and your Poolmiser is now ready to operate.
NOTES
To adjust the water level, turn off the water supply, remove the cap, adjust the shank (turn to the left for lower and to the right for higher) to the proper desired level, and replace the cap. The water level is usually set between 3 and 4 inches below the top of the cap. Turn on the water supply. A final tune-up can be made by adjusting the clip on the side of the float.
**VERY IMPORTANT (Please Read)**
Do not reduce the equalizer line; 1 ½” is the minimum (the line can be bigger). Equalizer line can be installed at any depth below 12” from the top of the water (up to 10 feet).
To avoid damage to the Poolmiser and all plumbing connections, keep the fill line between 30 psi to 60 psi.
It is a good idea to take the valve apart before you install your first unit to know how the valve functions, for adjustments, and for maintenance.
Overflow lines should always be hooked up to prevent overflowing from heavy rain or malfunction of the system.
The provided overflow standpipe is tight-fitting; DO NOT GLUE.
The Poolmiser is not designed with secondary containment, so it should only be used in outdoor applications and should not be installed in or above finished living or workspace.
GENERAL INFORMATION
The Poolmiser will operate if it is placed one foot from the pool or up to 30 feet away.
The Poolmiser is capable of adding up to 4000 gallons of water in a 24 hours period.
The Poolmiser should be turned off completely for 15 days after installation to make sure your pool is not leaking.
If the valve does not close completely, or if it drips, there is some dirt or debris in the valve cap. Clean the cap under running water, and flush the line.
Water hammer can be caused by a variety of factors……if you experience water hammer in the operation of your POOLMISER, consult with a plumber.
The Poolmiser is made of ABS plastic; most of the piping is made of PVC plastic. Be sure to use a pipe cement compatible with both materials.